Showing posts with label jewelry. Show all posts

March 5, 2019

Video Killed the Radio Star


So...I've been hibernating, but I have still been active over on YouTube!

I know I sound like a broken record, but it seems, just like last year, late winter/early spring is when I really dig in and get a bunch on the "page" (okay, document). So I have been writing, and helping install new wood flooring at my parents place, and it's been cold...and I haven't been very glam lately.

But here are two of my more recent videos covering most of my brooch collection, and hopefully you enjoy this peek into my costume jewelry box :) I hope you are all well and get some cozy hibernation time all to yourselves too!


August 28, 2016

Sunday Spotlight: Damascene Jewelry


Last week I picked up some new-to-me vintage jewelry, shocking I know ;) I have long wanted to pick up some more damascene pieces to match a bracelet I have that I wear often. In the end I decided on the two pieces above, a maple leaf shaped brooch and a super cute pair of earrings--but you know what? These new pieces don't match my bracelet, because these pieces are Japanese (Amita) damascene and my bracelet is Spanish damascene. Huh? Well yes, there are two major types of damascene jewelry out there, but before I show you the difference, lets talk about what damascene actually is!

Wikipedia describes damascene as follows: 

"Damascening is the art of inlaying different metals into one another—typically, gold or silver into a darkly oxidized steel background"

Makes sense when you look at the jewelry above, dark metal background with designs inlaid in brighter metals. The technique is as old as ancient times in several parts of the world and has since had a long history in Japan, where it was used to decorate katana fittings among other things. Though popular as decoration on swords during the Edo period (1603-1868), after the Meiji Restoration government banned the carrying of swords the craftsmen turned to using the technique on other objects and jewelry. Damascene jewelry and items became a major souvenir and export items to the West and the most common name I've seen on Japanese damascene jewelry, Amita, started in 1932. There is a cool little breakdown of the company's history on their website here. Goodness knows I'd love to pick up some more damascene as souvenirs while traveling in Japan, anyone want to pay for my trip? 

All of this history is of particular interest to me as I have recently become really interested in the Meiji Restoration time period in Japan, but more on that nerdiness in tomorrow's post ;) Want to see some more pretty Japanese damascene (or as it is often known in Japanese, Shakudō (赤銅))?


Gorgeous! Then there is Spanish damascene, which is similar but the designs themselves are very different, tending to be more Renaissance or Islamic in style. My hunt will continue for earrings and a brooch in the Spanish damascene to match my bracelet, while of course now I want a Japanese damascene bracelet to match my new pieces! #shopaholic, or is it that I am a "collector"? Yeah that sounds better, collector *cough* Some examples of Spanish style damascene below :)


My bracelet is similar to this one :)


Do any of you have any damascene jewelry or objects? I definitely will be collecting more in the future! The Japanese designs particularly hold my heart at the moment, but the Spanish style is really pretty too! I hope you enjoyed our little jewelry lesson today :)


August 5, 2016

Another Miriam Haskell's Style DIY: Wooden Bead 1940's Necklace


I have recently been in the market for a wooden bead necklace in the style of 1940's Miriam Haskells. Then I found little cylinder shaped wooden beads on sale at Joanns! Thus a DIY version was born, and for much less $$$ than a real vintage collectible piece would have cost me! Of course I documented how I put it together for you all, though it is practically cheating posting this-- as it is virtually the exact same technique as my other Miriam Haskell's style tutorial! You don't mind do you? ;)

Here are the vintage necklaces I was inspired by...


I found all of the materials for this project at Joanns and the beads were even on sale which was a nice bonus. You will need:

-Wooden cylinder shaped beads (or any other wooden beads that you'd like)
-Colorful milk glass/opaque seed beads, I choose a medium size
-Headpins
-Chain
-Clasp
-Jump-rings
-Round nose pliers
-Another set of pliers
-A jewelry wire cutter


First cut yourself a length of chain for the necklace, mine here is about 17" long. Thread your beads onto the headpins with one seed bead on either side of the wooden bead.


Next create a loop at the top with the round nose pliers, keeping the beads under tension so you end up up with a little hoop at the top.


I made 9 little charms with larger wooden cylinder beads and then started on the smaller beads. Making this many little charms/dangle-bobs will hurt your hand with all of the plier work, I recommend breaking a project like this up into a few days so you don't end up with a raw sore hand like I've got now!


I made 12 charms of each red, blue, white, and yellow colored accents. I also made 4 of each green, mid-toned blue, and aqua.


I attatched the first larger charm in the dead center of my chain. I then added the rest on either side alternating the colors as I saw fit. I placed each one 3 chain links apart.


I already think this looks cute on its own but I persevered onward. I added two smaller charms of different colors together on one jump-ring and placed these centered between the larger charms.


This took a while, and I basically just placed the colors as randomly as I could to get them as spaced out as I could. After I put one set of smaller charms between each larger bead, I placed three sets at either end. Then I took the left over smaller charms and filled in some of the spaces between the larger charms and the smaller ones. Does that make sense? I hope so. After that I added the clasp on the back of the chain with more jump-rings. Then it looked like this:


As you can see I whipped up some matching earrings too! Gotta have a set :)) You could also make a bracelet with the same techniques. I'd like to try making a brooch next, but not until my hand stops being sore!

 I hope you guys liked this little peek into my night of jewelry making, happy crafting!


May 27, 2016

DIY V for Victory Brooch


It seems summer is the patriotic season here in the US with Memorial Day kicking off the summer, Independence Day in July, and Labor Day at summers close. Though I'm not very patriotic myself, like most vintage loving ladies I have no problem celebrating the victory in WWII. If there was one war that had to be fought it seems WWII deserves the title, with horrible ideas that truly needed to be crushed. Fashion certainly turned to celebrate the war's end with patriotic prints and all things red, white, and blue. One of the most collected WWII related fashion accessories is the V for victory brooch. See some vintage examples below (from a simple search on Pinterest)...


As I wear 1940's fashions all the time I thought it was high time I acquire a V for victory brooch myself, but you all know I am crafty by nature so I figured I'd DIY a little something. I spotted these great little wooden letters at my local Joanns and knew they would be just the right size for a brooch!


To make a victory brooch yourself you will need:

-Wooden V from a craft or hobby shop
-Pin back
-Glue (e6000)
-Acrylic paints (and I snagged a clear sealer too for a nice finish)
-Paintbrushes
-Rhinestones (optional)


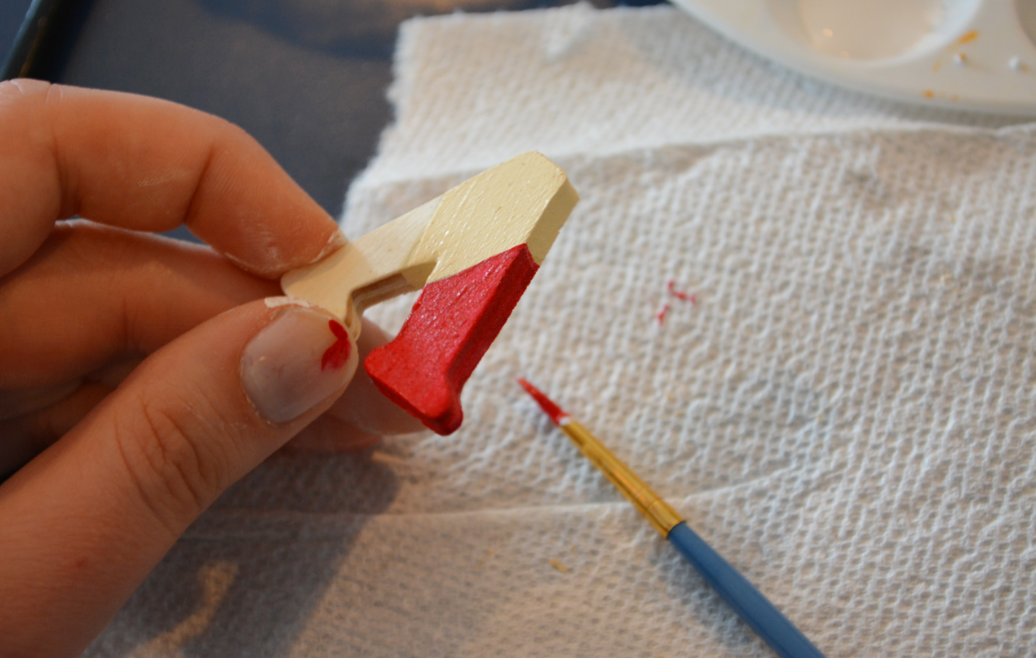
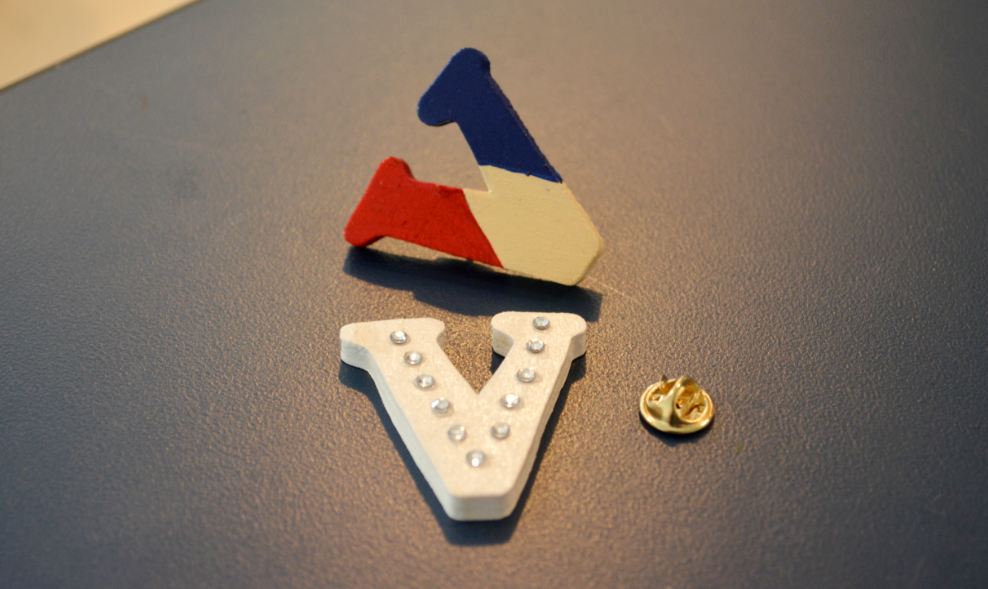
I sketched out my basic design, super simple red, white, and blue stripes. I pained the second V all white.


Make sure to keep those nice sharp lines down the sides of the V as well. I left the V to dry between coats and did three coats in the end as the wood is pretty porous by nature.


After each V had dried, I topped the paints with a thin layer of clear gloss sealant.


For the white V I added rows of clear white flat backed rhinestones with tiny dabs of e6000. I usually use a (sacrificed) pin for doing tiny detail work with glue.


Once everything is dried once more, glue on a pin back of some sort!


Then you're suddenly finished! Wear your V for victory pin with your 40's duds for an authentically optimistic look! Great for a day at a WWII reenactment or event, or any day you feel extra patriotic!


September 29, 2015

DIY Scottish Plume Pin

Ralph Lauren Fall 2012, Vogue.com
 While planning my fall wardrobe projects for this year, I new there was going to be a lot of plaid and tweed. What goes better with plaid and tweed than Scottish themed accessories? I loved the feather plume pins at Ralph Lauren from his fall 2012 show and instead of buying a similar brooch on Etsy I thought, "Well hey, I can make that!"

So after a quick trip to Michaels for some supplies, and raiding my sewing/craft room for feathers, I sat down to make a few traditional style plume pins. This is a super easy DIY...


Supplies include:

-Little metal tube findings from the bead section
-Decorative metal bead caps
-Spare beads
-Long headpins
-Various feathers
-Glue
-Pin backs


I began by threading a bead, then a long bead cap, and then finally a metal cylinder onto a long headpin. Instead of turning the end of the headpin, or clipping it off, I left it to add some support for the feathers. I put some glue around the outside/bottom of the little tube so it would stay in place inside the bead cap.


September 9, 2015

DIY Renaissance Revival Jewelry


I have always really liked the look of Renaissance revival jewelry with all of its colorful enamel work. While browsing brass stampings on Etsy the other day a grand idea struck me, it would be so easy to DIY the look with brass stampings and nail polish! After all, what is nail polish but enamel anyway? So I collected some brass stampings, nail polishes, and my nail dotting tools and got to work!

But first, some inspiration...

Totally gorgeous right! (sources: 1, 2, 3, 4, 5)


 Alright so my versions aren't nearly as elaborate or jewel studded, but the idea is there! For this is a super easy DIY, you will need:

-Nail polish in various colors (stick with creme solid color formulas for a more authentic look, go crazy with shimmers and glitters if that's more your style)

-Brass stampings (Etsy is a good place, but most craft stores have them in the beading section)

-Nail art dotting tools (or toothpicks, small paint brushes)

-Acetone (for mistakes)

-Beads/Findings for finishing your jewelry (also chain or ribbon to hang your pendants from)


My materials and a covered table in case of spills.


I grabbed a spare envelope to use as my paint palette, but almost anything would do. I started with white nail polish and added a big glob of it onto my palette!


I used a fine pointed nail art dotting tool to "brush" my nail polish/enamel where I wanted it on my brass stamping design. Check out real Renaissance revival jewelry for inspiration on colors and placement of enamel.


Related Posts Plugin for WordPress, Blogger...