Showing posts with label crafts. Show all posts

April 19, 2017

Sequins & Stars: Painting on Tulle and Sewing on Sequins


So when we left off I was creating appliques of planets to populate the void of my galaxy inspired black tulle circle skirt, but I ran up against a problem. Even with several planets and the little metallic star field rectangles I had made, there simply wasn't going to be time to use only sequins and beads to embellish the skirt to the level I wanted in the time I had left! I sewed the panels and appliques on, and then I had to figure out a new plan. I did mention I was trying to finish this skirt in time to pack it to wear in Paris right? Well...yeah. So knowing what I had learned about painting on tulle, I experimented a little further.

Sure painting on the tulle directly doesn't work in the way painting on paper or even regular fabric does, but it does create a shadowy imprint of the design you choose. This effect is of course created by the fact the the paint covers only the netting, and being so fine, and with so many spaces in structure, the result looks almost like you took the painted design and turned the opacity down to 10%. This is enough however for the design to still appear, especially if, like I did with the metallic painted rectangle sections, I could ensure some of the paint did fill in the windows of the tulle. Did any of that make a lick of sense? Perhaps photos will help.


First I put down some wax paper all over my big drafting table. Covering the table in regular paper wouldn't have worked as wet painted tulle would have dried sticking to the paper, and then when I peeled it off bits of paper would have stuck, and that would be bad! I mixed up some regular acrylic craft paints (its not like I will ever be washing this skirt!) and added a bit of gloss varnish to each hoping that would make them stay better and not flake off the tulle like perhaps matte paint would do once it dried.


Ah look how bright and defined that looks! Remember, you are looking at the artwork on the wax paper essentially, once you see it on only the tulle the design is much much fainter. I drew in a couple of distant galaxies and some general clouds of nebula spaced randomly around the circle shape of the skirt.


I even broke out some natural sea sponges that I used to use for watercolor painting ages ago! These worked super well for getting very organic and whispy nebula clouds. As you can see in the photo above I dotted on a few stars in with paint too even though I knew I would be adding sequin stars later as well.


Here is what the tulle looked like once the paint had dried. You can still see the painted areas, especially because my table is a dark color and a dark background helps the tulle almost disappear and the painted sections remain visible. Also you can see that where the tulle was two layers and already painted over the rectangle appliques the paint took better and came out brighter.
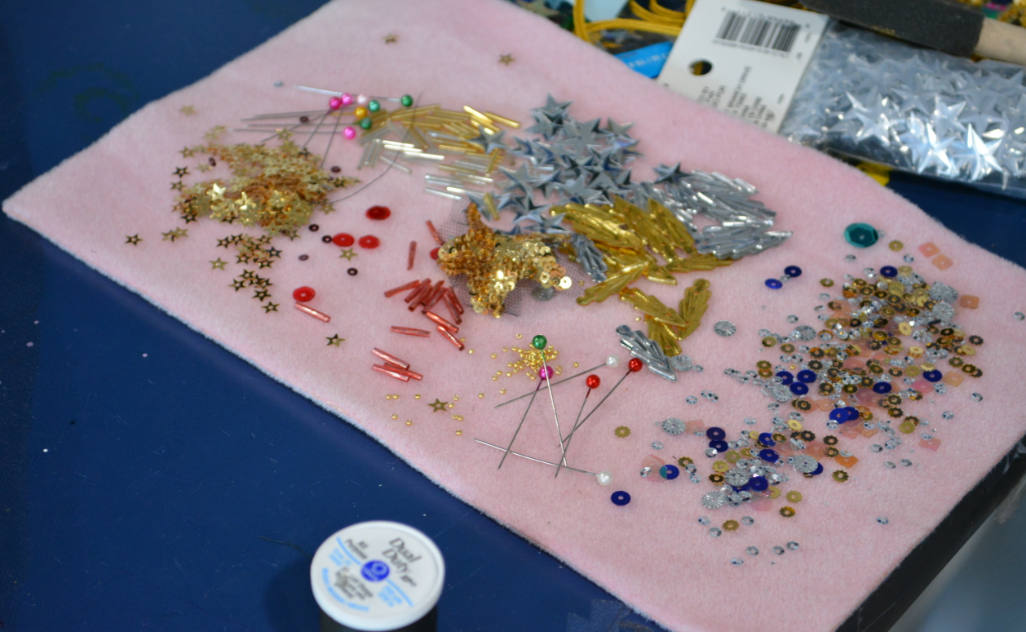

Then it was time to get to work sewing sequin stars all over. Shall I add up the hours? Hmm...lets say around 16-18 hours of sewing on sequins and beads! My back was killing me from leaning over this darn thing! Worth it though! At least I hope you will agree it was in the end. I listened to lots of lovely podcasts and for a few days had the Star Wars Celebration con live-stream on in the background. Apropos no? (Also that teaser trailer ahhhhh!)
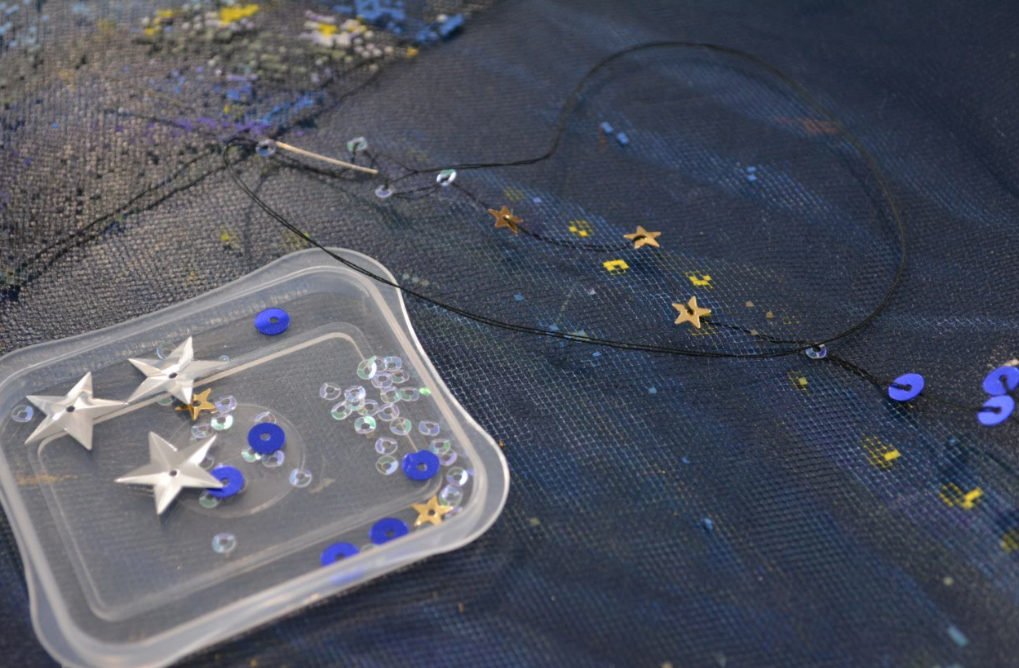

I sewed every sequin on by hand at this stage, using beads occasionally and to hold the centers of the larger sequins and star shaped ones. I should note that the large star shaped sequins are from Michaels crafts and come in packs of silver, gold or multicolor. They have some cool sequins at Michaels right now! Who knew? I tried to limit the colors and specific types of sequins I used to keep the whole skirt looking cohesive. Most of the little constellations were done with large silver stars and tiny gold ones as a repeated motif, though I used some tiny iridescent sequins and some deep blue metallic sequins for the galaxies.

Alas this is where I leave you for now, as I was rushing to finish the skirt! The good news is that I did indeed finish it in time to pack it in my luggage, so if all goes well (knock on wood) you should be seeing the finished skirt in photos soon :)


March 31, 2017

Sequins & Stars: Cutting out the Tulle and Embroidering Planets


Well after finishing the beaded bolero, I have made some progress on my planned galaxy inspired black tulle circle skirt! Before I can really get down to the rather daunting task of embroidering on all of the starts and scatterings of sequins, I had to cut out the layers of tulle and make the larger applique embellishments!

Before I even cut out the layers of the skirt, I decided to play around with painting some of the tulle metallic gold with acrylic craft paints. While it turns out painting tulle isn't exactly possible, I did discover a really cool effect by accident! If you dab on a lot of paint and then peel off the tulle net very slowly, the paint gets caught in the windows of the net like little tiny stained glass almost. I made a bunch of small rectangular strips in gold and silver using this effect and I think they will be great stardust/background galaxy filler for my skirt!


I did have to cut out the layers for the skirt eventually though, so I wrestled the tulle into submission and cut out 3 layers of circle skirt from really wide (108" wide I think it said?). Using super wide tulle means you don't have to have side seams in the layers of your circle skirt. See crudely drawn illustration below! Simply layer the wide folded (it comes folded off the bolt) as wide as your circle skirt pattern is "long" through its center. Layer as many times as you want for how dense you want your skirt. I cut mine at 3 layers of folded tulle (so 6 layers of net total but with the folds lined up). That was 6 yards of tulle by the way for 3 layers. I accidentally bought shiny tulle instead of matte, so I cut a 4th layer for my skirt out of 45" wide matte tulle since I had some in my stash. Since this matte tulle was only 45" wide this top layer of the skirt will have side seams, but I doubt it will be that noticeable in the end.


So above you see my top layer of this skirt laid out on the carpet so I can play around with how I want to arrange the galaxy of appliques and embroidery on top. I am in the middle of creating some sequin and bead embroidered planets for my fictional galaxy that I will cut out and sew onto the skirt tulle. Once these larger appliques are sewn on I will populate the galaxy with hundreds of sequin stars...but lets not think about that now as it is going to take ages!

Now you may be thinking I am a bit mad, and also that all of this would be much easier if I had a large embroidery frame (they certainly use big tambour frames for this type of work in couture), and you would be quite correct. Seeing as I only have small circle frames however...I'm doing the best I can!

Also my desk looks like this...


Beads and sequin everywhere! The silver moon (or wait...that's no moon!) you see in my embroidery hoop there is finished, but as it took way too long to bead so precisely, I will be using more simplified designs for the other planets!


I had never done tambour embroidery on tulle before and so far I am not a fan! Usually when making appliques you would use silk organza which is much stronger that this nylon (poly? I don't know what they use to make tulle!) tulle netting. Despite tulle being obviously much cheaper than silk, I would still much rather be using silk, but the only place that stocks it near me is 40 minutes away and I didn't want to make the trek! For those of you unfamiliar with tambour embroidery, it is done with a tiny needle sized hook that is much like a sharp crochet hook at a miniature scale. (I sort of wonder if anyone has tried to crochet with one of these before?) To embroider, or more often to sequin and bead, you work from the back side of the fabric and push up the sequins from underneath. You can only really do this on sheer fabric since you wouldn't be able to see what you were doing otherwise! Here is a video showing how tambour embroidery works. I was super lucky to take an introduction to tambour class at the Royal School of Needlework while I was studying abroad back in university. In fact the instructor in that video (Robert Haven) was the same instructor who taught my class at the RSN! I highly recommend embroidery classes at the RSN by the way, you get to sit inside Hampton Court Palace and embroider which makes the whole experience extra special!

So this has been the crazy galaxy sequin skirt update! Hopefully I will have more progress to show you all soon! Are any of you working on a crazy or long term project these days?


February 22, 2017

DIY Embellished 50's Sweater


Sometimes when you are watching a film, a costume will be so pretty that it will break your concentration on the story. Now some will say this is bad costuming, because it brings you out of the narrative, and it is indeed bad news when a costume is too over the top, awful, inaccurate, or otherwise distracting. However, some things are just really pretty though, and perhaps it is because I have my eye tuned to pick up on costuming anyways that this phenomenon happens for me more often then would otherwise be usual. 

Well, I fell for this lovely sweater in Brooklyn, and I immediately wished it would get in my closet!

Saoirse Ronan as “Eilis Lacey” in BROOKLYN. Photo by Kerry Brown. © 2015 Twentieth Century Fox Film Corporation All Rights Reserved
That is one cute sweater! I loved the costuming in Brooklyn in general, but this was one piece I could actually come close to recreating on the fly. I had two simple sweaters from Lindy Bop that I hadn't been wearing as much as I thought I would when I got them, so I decided it was meant to be-- one of them had to get embellished à la Brooklyn.

There are a few things to keep in mind before you dive into embellishing a sweater, so I took some photos along the way to show you all how I went about decorating mine. All you need is: a sweater, a needle and thread, and whichever beads/sequins/rhinestones/other jazzy stuff you want to sew on.


I think it is best to start out by laying everything flat and playing around with the design and placement. A good place to get some inspiration (as always) is on Pinterest looking at 1950's beaded cardigans, as there are plenty of pretty ones of those around! You could of course embellish a button down cardigan just as easily as a pullover sweater.


To start I knew I wanted to copy the tiny pearl lined neckline from the Brooklyn sweater. Using a length of thread (doubled and knotted) to match the color of my sweater, I sewed each small pearl bead on using the ribbing of the neckline as a guide to space the beads out evenly. The key with embellishing a knit garment though is this: remember this thing is still going to need to stretch! 

If I simply used one length of thread to sew on all of the beads around the neckline, the neckline would no longer be able to stretch when I tried to put on the sweater. So what does this mean? It means I sewed on three beads, tied a knot in the thread, cut the thread, then started over for the next three beads. This break in the line of thread every three beads ensured my neckline would still stretch when I went to wear my sweater!


This same remember-the-stretch principal should inform your other decisions about how many beads/sequins/what-have-you to sew on before tying off and starting a "new" thread. The more stitches (and the farther apart/longer they are) done with one piece of thread, the less that area will be able to stretch afterwards. So to be cautious, and help inform my design as I went, I sewed the next set of beads on individually, starting the thread and tying it off again after each bead. Yes this is a bit time consuming, but put on a podcast and lean into the activity of some good old fashioned hand sewing.

You can see in the photo above that instead of just eyeballing the placement of the rhinestone/beads I used a ruler to mark dots (with a colored pencil in this case) 1 inch down from the pearls and an inch and a half over from one another.


Sew-on rhinestones with a bezel like these have holes on the underside so you can sew them onto your projects.


After I had the rhinestones sewed on, I added some diamond shaped sequins in silver in gold on either side of the jewel. As you can see above these sequins have two holes which make them a snap to sew on. To sew on a single hole sequin by itself, you can stitch up from inside the center hole and then come back down on the outside of the sequin, or if you don't want to see a stitch like that, use a tiny seed bead threaded onto your needle before taking it back down the center hole again.


To create little daisy-ish round designs, simply sew on a bead or sequin and then thread the needle up through the material on one side, slide on some smaller beads (in my case seed beads, enough to reach around the pearl) to fit and then move the needle back down through the fabric in the same place you started, creating a little loop of beads next to the one you would like the smaller beads to surround.


Simply push this loop over the bead and then tack it in place with a few stitches! (See above)


I almost thought I was done at one point, but then I added a few more pearls, this time little rice shaped ones, in between the sequin embellishments. After the pearls I called it done and tried on the sweater to make sure everything looked all right. You can of course add as many or as few embellishments as you'd like!


I am really pleased with how this little project came out and I think I will wear this sweater more now that it is sparkly and fun! Do keep in mind that such embellishing work could render your sweater dry clean or hand wash only of course, especially with beads like faux pearls as heavy washing could remove the pearly finish from the beads.

I hope this was helpful for any of you thinking of embellishing some knitwear :) It's time for me to get back to some different sewing, as I finally try to fix my bodice pattern once and for all!


October 28, 2016

Pattern Drafting: Tools of the Trade


As many of you know I make the majority of my clothing myself and I have been sewing now for over a decade. I first learned to draft patterns (and how to drape too!) during my freshman year of design school back in 2009, and I have never looked back! After having been restricted to commercial patterns for my early years of sewing, nothing felt better than being able to draft anything my mind could dream up onto paper. Move the darts into a princess line seam instead? Change a neckline? Add a sleeve? With some basic pattern drafting skills, a whole new world of possibilities open up!

So what do I use to do my pattern drafting? The most basic of tools are paper, a pencil, and scissors of course, but upgrading these basics from what you have lying around to real deal equipment makes the experience so much nicer! My favorite pattern drafting tools include:

1) A flexible clear ruler. These bendy (but not too bendy) clear rulers usually have red lines and mine as you can see below is 18 inches; though when I studied abroad I did have a different one that was centimeters instead of inches. This is my main ruler for drafting, and I actually have two of them lying around my sewing room as I like them that much!

2) Alphanumeric paper. Of course hypothetically any paper could be used for pattern drafting, but alphanumeric paper (gridded with you guessed it, letters and numbers) is my favorite for both the general 1"-ish (it's not precisely perfect but it'll do) grid and for its light weight. Tissue paper rips too easily, poster-board and the like are too thick, alphanumeric paper is just right.

3) Big paper shears. Why have such ludicrously large paper scissors? Well because they make cutting through any weight paper a breeze and are frankly easier to use on wide width paper when your cutting it off the roll. The shorter blades make them easy to use on curves too, plus they can probably double as a weapon in most zombie apocalypse scenarios (just kidding).

4) Curved rulers. Nothing better for hip and arm hole curves than these standardized curved rulers sold for just this purpose. Find them online or at most fabric shops and keep them on hand for smoothing out curves.


5) Pencils. Obviously, of course. Also a larger eraser for when you change your mind :)

6) Scotch tape. I like regular old plastic scotch tape for putting together and changing my patterns on the fly.

7) Weights of some kind. I use my brick-like tape dispenser and paper shears when I get desperate, but they do sell specific pattern weights for holding down your paper when it wants to roll back up while you attempt to draft on it.

8) Pattern Making for Fashion Design by Helen Joseph Armstrong. Of course I am still no expert on pattern drafting so I pull out my textbook from university from time to time when I want to know how to properly add ease here, or move darts there, or change a style line I'm not familiar with. It's good to have resources on hand so you don't have to break the flow searching for hours on the internet to see how something is done. There are dozens of pattern drafting books out there, but this is the one I have always used and I do quite like it.

Of course there are a bunch of other tools out there, from tracing wheels to special carbon paper, but this relatively short list of tools are the ones I have in constant use myself. I hope to start sharing more about how I make and transform my patterns here on the blog in the near future, so I figured going over some very basic information today would be a good start! Do any of you draft your own sewing patterns? If so, what are your favorite tools for doing so?


September 30, 2016

Another Little Fall Leaf Hat Tutorial


This isn't the first felt leaf hat tutorial I have posted here on TCH, but since the style I made today is a bit different I thought I'd put up a little tutorial. :) I am busy busy today in the sewing room, so today you get a peek inside at just what I'm working on!

I knew I wanted a mustard yellow hat to wear this fall but I couldn't seem to find a vintage hat in a style I'd like, so I decided to make one of course! I purchased some lovely 100% wool felt on Etsy to make a hat, but was stuck on what style should I make? That was when I spotted this perfect hat on Etsy...

Etsy Shop
I sorta can't believe I haven't hit "BUY IT NOW" (as I write this the hat above is still for sale and for an absolute steal!) but I know as much as I love it it will be totally lost in my brown hair. I wouldn't want a cute hat like that to go to waste blending right into my hair color, so I leave it to one of you to snap it up instead! Still the overlapping felt leaves is a worthy idea.

What would you need to make a similar hat to mine?

-Wool felt (or craft felt, but the wool is so much nicer and more authentic looking!)
-Scissors (and possibly a craft/exacto knife)
-Card-stock to make your patterns
-Millinery Wire
-Velvet leaves (optional, you could just make bigger felt leaves, I found the velvet ones at Joann)
-Needle and Thread

So I went to work on my nice wool felt cutting out leaf shapes...


Simply print out or draw a leaf shape of your choosing and trace onto your felt. Cut out quite a few of these.


I made a few larger leaves with interior cutouts (on the right in the above image) to add as an accent on one side of the hat. Just use an exacto knife to carefully slice out teardrop shapes from the inside of the leaves.


To make a base for the hat I took a circle of millinery wire and bound it shut with plumbers sealant tape. This tape is great for millinery wire! #notcoutureapproved :) I used to use floral tape sometimes but find it too sticky, this stuff is better. I carefully bent the wire into a long bean-ish shape to fit my head.


Then I covered the wire base with a strip of felt wound around the wire and secured with a few stitches in matching thread.


To make a foundation for the smaller felt leaves I used some large velvet leaves I found on sale at Joanns to fill in the space between the wires. I simply stitched the parts of the leaves that touched the wire (and each other) down. This is why wrapping the wire in felt is excellent because you can sew right into it no problem! These leaves came in various colors and types and look very like vintage velvet millinery leaves...so I stocked up! I mean, I seriously bought a ton of them! They were less than a dollar a pack, so get thee to a Joann ladies!


Once you have a hat base essentially together, start layering your felt leaves and tacking them down, overlapping each leaf over the last and adding a stitch through both leaves and into the covered wire beneath.


Keep layering on both sides of the hat.


Before you know it, presto! A fall-tastic hat appears! I pinched the larger leaves with the cutouts at their base for some dimension and stitched them onto one side for some extra flair. I really can't wait to wear this new hat and am really tempted to make another in orange or perhaps red? Or every color? The options are endless! The same techniques could be used with any shape really, like flowers for spring :)

How is your fall crafting going? You have started haven't you ;)


August 31, 2016

Making a Brimmed Hat: Attaching the Crown and Brim (& Finishing the Hat!)


Well hello there! It took me a little while to finally finish up my most recent millinery project, I've been a busy bee lately! Today I'll be going over how I finished putting the hat together once the crown and brim have been covered with fabric individually. 

Once you have covered the pieces of the hat, it is simply a matter of stitching the crown onto the cut tabs of the brim.


To hold the crown and brim together while I sew them together, I pin from the outside in through the corner while holding the two pieces together like you see below.


Above you can see what the pinning looks like from the outside.


Now simply stab stitch through the many layers to stitch the crown and brim together. That's it? Yes, and oddly it ends up feeling quite secure.


Of course then there are visible stitches on the outside of the stand, but of course you will be tacking on a ribbon right? Yes indeed, I've gone for a tiny velvet ribbon in this case.


What about the inside? Well officially you should stitch in a lining, I usually do a lazy lining of a circle of silk larger than the crown opening gathered in place and stitched along the edge. Over this lining you will stitch in the petersham head ribbon, or if you are really really lazy like me you can skip the lining (...yep) and just sew in the ribbon.


Then we have reached the very best part of hat making, decorating the hat! I had this vintage wide striped ribbon I bought just for decorating a hat such as this, and it dominates the shape for sure. I decided to pinch the ribbon into a sort of butterfly shape and I love how it came out!

I hope you all enjoyed watching this hat come together, I am certainly excited to wear it! I need more 1940s dresses to wear all of my hats with :)


Related Posts Plugin for WordPress, Blogger...