

So after last week's incredibly fun foray into math...because, sure, math is fun, now we must focus on making the new sloper pattern we have drafted fit properly. It is very doubtful your new sloper will fit perfectly right after you plot it out, or if like me you resorted the the standardized measurement chart it is almost certain that the resulting pattern won't fit you perfectly! Never fear, we aren't looking for perfect, at least not yet! Time to start fixing and fitting!
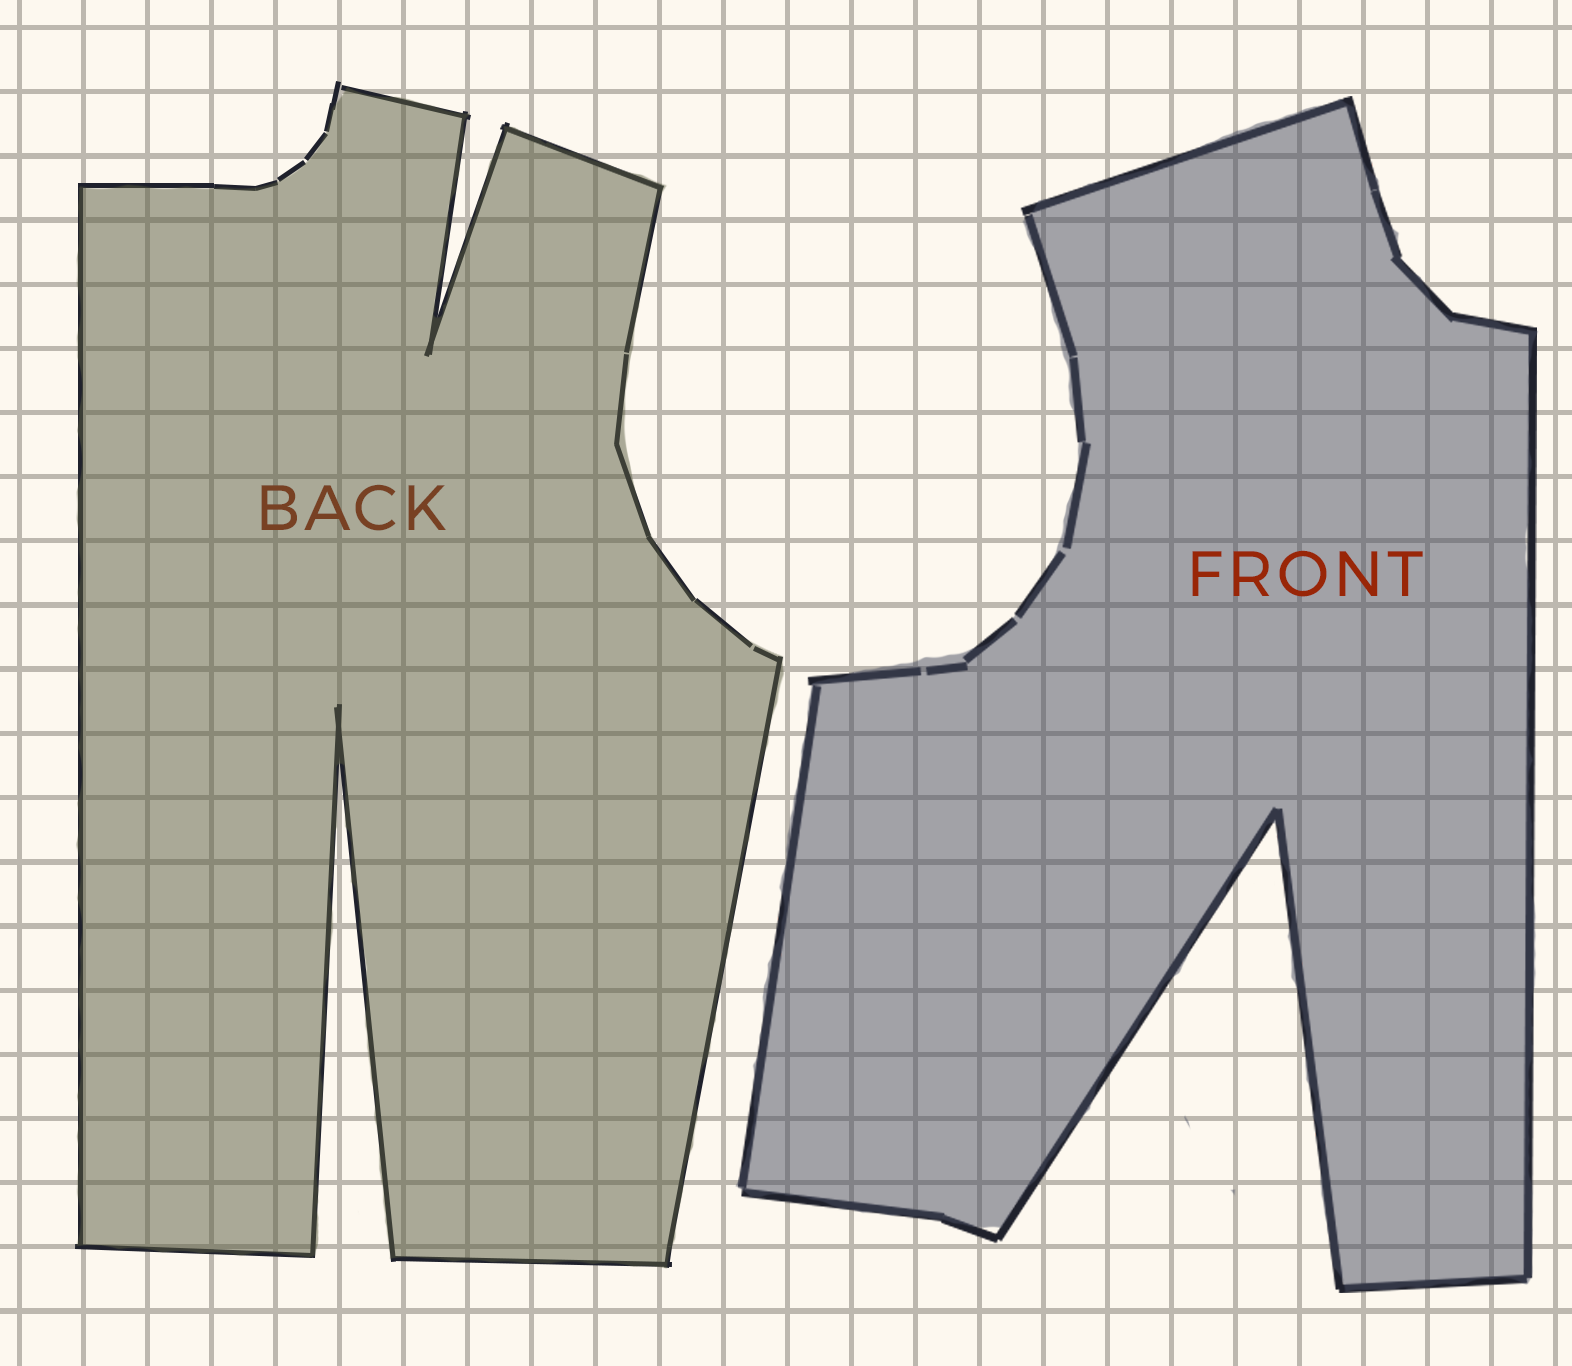
So you have your shiny new front and back sloper patterns. Before we try testing out said patterns in a muslin mock up, we have a few more adjustments to make. First we must switch from one giant dart on the front bodice to two moderately size darts.

To do this first we draw a line from the side into the apex (point K from last time, I will refer to this point as the apex from now on). Measure down 2 1/2 inches from the armhole/top of the side and draw a straight line in to the apex. See above. Next cut along this line right up to the apex point.

Cut along one of the dart legs up to the same apex point but not through it. Now the corner should be sort of hinged and free to move around.

Now with this corner loose we can close the waist dart halfway like you see above. This opens up a new dart in the side seam. This technique is called slashing and spreading by the way, and later we will come back to it and learn more about moving darts around using this method. Tape down the new shape of the waist dart and tape a piece of paper into the new side dart.

Mark 5/8" in from the apex in the new side dart and connect this point to the start of the dart along the side to create the dart "legs".

To find the proper shape for the excess within the darts, fold the paper as the final fabric dart will be sewn, (fullness folds in towards the center front for the waist darts and folds downward for side darts. While the paper is folded cut the excess paper beyond the edge off as seen above.
With the one dart now split into two, add 1/2" seam allowance to all the edges of your front pattern.

Now at this point lets take a look at what I have for my new sloper compared to my actual finished I-use-it-all-the-time old sloper pattern. The new one that I drafted in last week's post is underneath my old pattern (outlined in black) above. As you can see the new sloper is bigger in general than my usual pattern, and the back is longer. Notice too how the front armhole is shaped differently too. Clearly there will have to be changes to my new sloper for it to fit the way I want it to, but no cheating! The next step is to create a mock-up of the new sloper pattern and make fixes until it fits the way I like and then we will compare the two patterns again. I may not run into all of the same fitting problems that you will with your newly drafted sloper, but hopefully walking you through my process will show you how it is indeed possible to end up with a perfectly fitting pattern from a self drafted sloper.

One last thing I did to the sloper pattern at this point is I closed the shoulder dart in the back before adding the seam allowance to the back piece. To do this I merely extended the waist dart leg and the shoulder dart legs until they met, cut just up to this point, and slashed and spread the shoulder dart completely closed. See above. Then add seam allowance, always remember seam allowance!

Of course cutting out the mock-up takes some level of extra consideration, as to have the opening at the center back makes it hard to fit the muslin on yourself, so cut the back with the center back lined up along the fold (the seam allowance you added will extend over the fold). See above. Cut the fronts out not on a fold by just flat in two pieces. Beginner seamstresses note: the pieces are lined up with the grain of the fabric instead of on any angle, I'll get into fabric grain another time.

Transfer your darts onto the muslin, I usually poke holes in my pattern with stray pins and mark through this hole with a pencil or chalk.

Draw your darts nice and precise since we are using this muslin to correct fit.

Also use this time to draw a line indicating the center front line along the front and backs of both front pieces. This way when you go to try on the muslin you can pin along this line.

Sew up those darts, sew the side seams and shoulder seams together, and now you have a muslin/mock-up! Try it on by pining together the center front along the lines you drew.
Now, do you want to see how my new sloper pattern fit right out of the gate with no fit modifications? Of course you do, though I warn you, the winners for most unflattering photos of me possibly ever go to....

Here is the front. The major fit issues include: overall too long, but the apex is at an okay height so I know this length needs to come off the bottom, the armhole needs a dart's worth of fullness pinched out of it (a typical fix for me), there is generally more ease than I like in the body of the bodice, and shoulder hangs off my actual shoulder much too far. So get a colored pencil, a marker, or just some pins and start marking what needs fixing!

So now take off your muslin and start transferring the marks you drew on the fabric onto your pattern to see where you need fixes. This biggest fix on the front for me was to take out that dart's worth of excess from the armhole to the apex. Figure out just how much excess needs to come out of the armhole by measuring the markings you made on the muslin fabric. Instead of actually drawing in a new dart here at the armhole, we are going to move this fullness into the other two darts using the slash and spread technique again. Start by drawing and cutting a straight line from the mid armhole to the apex point, and slash through one side dart leg to the apex, and one waist dart to the apex. Now close the armhole "dart" you had originally drawn on the muslin. Split the amount of fullness that shifts into the other two darts between the two and fill in the new open space with paper. See below.


You can see in the photo above that the armhole now looks totally wonky, but just draw a new curve from the point where the "dart" closes at the armhole to the shoulder point and slice off that extra point that juts out from where we overlapped the excess closed. Now I need to deal with some of the shoulder fit issues. Below you can sort of see the pencil marks on the fabric indicating I need to trim the shoulder inwards about an inch to start with.

This ended up being about the same amount as the excess I needed to cut off from the armhole dart procedure so the curve I just mentioned was redrawn from the armhole dart overlap point to the new shoulder point. Yes, I am aware that was probably really confusing, I'm sorry! I din't get a good photo, ask for more clarification in comments if necessary.

Then, because I remember from fixing my bodice pattern earlier this year (which is a post you should look at, because like this one, it is all about fixing bodice fit issues) that the exact angle of the shoulder took me some finagling, I actually did cheat here and copy the angle of the shoulder to match my usual base pattern. You may have to trial and error the shoulder seam on your muslin, but it is worth it to get it right!

Then since I had marked my actual waist length on the muslin with colored pencil I took the excess off of my sloper pattern to match.

I also took a 1/2" off of the side front as the overall fit had too much ease for my taste. Why did I take the ease off of the side as opposed to the center front? Because the darts were in the right place so I din't need to mess with the center front. I took off a bit from the back side too, because too much ease man, too much ease. For the back I took an angled wedge shaped bit off though instead of just taking an even 1/2" off. This was because across the back it wasn't too big in the way it was at the waist so I knew I wanted to remove the ease from the waist area more so than the center of the back. To do this I measured in a 1/2" in from the side at the bottom of the side back and drew a line up from this point to the armhole and then cut this narrow triangle away.

To continue work on fixing the back pattern, I first held the side seams together and adjusted the armhole of the back to match the corrected front pattern. See above.

Then it was time to deal with the major issue of the back, the excess at the shoulder. I marked where I had pinned the excess in red pen on the fabric before I removed the pins.

A triangle slice of excess revealed itself.

Transfer this same triangle of nope onto your paper pattern. (The blue pencil dashes above on my pattern.) Connect these dashes and thereby create the triangle slice you need to remove.

At this point I held up my front pattern to the back and matched them up at the new proposed shoulder seam (with that triangle removed) to help guide me in drawing a new lower back neckline.

See above to the full triangle and back neckline adjustment I made. Slice that excess right off!

Now lets see how we did with out fixes in making my new sloper look like my old one that I know fits! We're looking much better! Again the new sloper is underneath my old one, and you can see now they nearly match up perfectly! The differences are that my old back sloper has a lower back neckline (which is because I naughtily used my sloper pattern and modified it directly instead of tracing a new one when making a dress recently...), and the waist is a bit more curved on my old sloper than on my new one. I also don't have seam allowance on the center front of my old sloper so you may spot that above. They actually match up really well over all which I'll admit was a happy surprise! Removing that armhole "dart" fullness from the front made the armhole magically the same shape on my new sloper as it was on my old one! :)
So those were my fit issues, yours may be different, and as I am not actually a super expert on fit I suggest you search specific issues not addressed here on the wonderful resources Pinterest and dearest Google. Feel free to ask me questions in the comments, but I am not sure I'll always know how to make the fix if it is an issue I haven't run into myself. With every body out there being a bit different, the variety of fit issues that can arise are nearly endless! Again I'll suggest you check out my other post about fixing bodice fit issues to see if any of those fixes are the sort you're looking for.
After making all of your first round of fixes to your paper pattern, cut out another muslin and repeat the cycle until the muslin fits how you would like. I didn't make another mock-up because my pattern pretty much matched one I know fits at this point. You may need only these two (the initial muslin, and the post-first fixes muslin) mock-ups/muslins, or you may need ten! This is the annoying part, but once you have a bodice sloper you can rely on, patterning different dresses becomes much easier!
Feel free to ask me for clarifications below and good luck out there fit finders!

No comments:
Post a Comment