November 28, 2014

Antiquing Glam

I was happy my mom had some time off from her busy school schedule this week to hang out and go antiquing with me! We stopped by my favorite antique mall and had fun walking the aisles as my mom looked for a big gold frame for a project and I looked for hair combs and jewelry! We both left empty handed, but had fun none the less!


Sweater: The Limited
Skirt: Made by me
Tights: Target
Shoes: Jessica Simpson
Bracelet: Vintage
Brooch: Vintage (etsy)
Sunglasses: Forever21

November 27, 2014

Closet Histories #3.3 : The Puritans


We're a day behind here on Closet Histories, but you can't blame me for wanting to post about Puritans on Thanksgiving! Lets take a short look into the wardrobes of those more pious ladies of the 17th century shall we?

For a bit of context, I am referring to the differences of dress for the Puritan movement at large, not specifically the American pilgrims. The puritans began to emerge as a faction soon after the accession of queen Elizabeth I in England. Essentially started by John Calvin, puritanism became a form of activism within the Church of England. They believed that the Protestant Church of England was still tainted by echos of Catholic rituals and symbols. Some puritans became so dissatisfied with the Anglican Church as to break off and seek asylum elsewhere, first in the Netherlands and eventually in colonies in the new world. The puritans believed in moral purity to the highest possible degree and condemned excesses in life and in dress. The colonies in America went even further, banning Christmas celebrations and most other festivities including games of chance, maypoles, and theater. Doesn't sound very fun does it?

In general, the puritan costume we see today (lank black dress, big white apron and collar) is not necessarily accurate or inaccurate. You could argue that it is a very commercialized and generalized amalgamation of the many 17th century portraits portraying ladies in black gowns with large white linen falling collars. These ensembles did exist, but what modern costume companies seem to be forgetting is that these black gowns were worn for portraits because they were the sitter's Sunday best, not necessarily their everyday clothing. Black fabric was very expensive to make and the color once achieved tended to fade fast. Still, such a luxurious color was indeed worn by pious Puritans of the time, but only by the very richest ones!

Puritans, especially those in America who took everything a bit too far, did indeed wear more conservative clothing than their more secular (or royalist) counterparts. You wouldn't have seen a Puritan in the relaxed off the shoulder, low cut, and spangle embellished gown like those popular at court. No silver tissue dresses for the Puritan! Still, that didn't necessarily mean they wore only rags either. The Puritan idea was to wear simple and modest clothing, but of a quality worthy of one's rank. Since wealth was believed to be ordained by God, to dress below ones station would be highly incorrect.

(fig. 1)                                                                                               (fig. 2)       

Look at these two ladies for example, quite the contrast no? The first portrait is of Catrina Hooghsaet (painted by Rembrandt in 1657), a Dutch mennonite. She wears a black gown and crisp white linen accessories, like our modern puritan costumes today, but notice the cut of her gown still follows fashion even without the low neckline of her contemporaries. The second portrait of Princess Mary Stuart painted in 1652 shows how the other half was dressing; with metallic silver woven fabric at her neck and peeking out from her gown's skirt, a rather full puffed sleeve, gold trimming at her hem, and of course the wide low neck so popular at the time. Comparing an English princess with a Dutch mennonite might not be very fair, but they each show the styles of their time and sect so very well I couldn't resist.

(fig. 3)                                                      (fig. 4)                                                                   (fig.5 ) 
Here are some more examples of ladies in more "puritan" looking dress, though I cannot say for sure these women were part of the movement. In England and the Netherlands, dress was less strictly governed than in the colonies, meaning people tended to continue following fashion more closely. When doing research for this post I found it rather hard to find portraits of women who were labeled as puritans. I can only assume the ladies above were more pious than their more fashionable contemporaries. The difference seems to be observed mainly in the necklines, where courtly ladies had their decolletage and bosoms on display, the more puritanical had layers of linen. I am sure there is scholarly research out there covering just this subject, but...you guys its thanksgiving and I have to go help out in the kitchen....In all seriousness, the subject seems to be less explored in both online research and certainly by modern costumers. Then again the puritans don't seem like a very fun group do they?

For more about Puritan dress, check out these links I found while researching this post!

-Shedding Light on a Dark Era: Baroque, Cavalier, and Puritan Fashions
-Portrait of a “puritan” – Dutch Mennonite
-Puritans Beliefs About Dress Codes
-1600–50 in Western European fashion wiki
-Puritan on Wikipedia


All of the information for this post has been gathered from the textbook Survey of Historic Costume (5th edition) by Phyllis G. Tortora and Keith Eurbank, from the links above or my own knowledge. I want to share the resources I come across with all of you as much as possible. The portraits used to illustrate today's post are credited to either the museum where they reside (whenever possible) or the source where I found them, and are linked via their fig. # underneath. Again I repeat my disclaimer that I am not a historian, and if you have corrections or additions for this post, please begin the discussion in comments as I would love to learn more!


Thanks for reading! 


November 25, 2014

Florentine Endpaper Manicure


I just love marbled papers, I can easily go crazy in a stationary shop! One of the best things about opening a really old hardback book is getting to see the gorgeous marbled end-papers on the inside of the cover. I decided that it wouldn't be too hard to recreate the look of old florentine marbled paper with the water marbling nail art technique. I think the most important trick of getting the right look is to choose the right colors. The easiest way to do this is to find an image of a paper you like the look of and then use those colors almost exactly. I really like how this manicure came out!


I used:

-Sinful Colors Unicorn
-China Glaze For Audrey
-Revlon Chic
-Sinful Colors Calypso
-China Glaze China Rouge
-Maybelline Color Show Bold Gold


Base color, Sinful Colors --
You all know how to water marble right? I mentioned it before in my malachite nail tutorial


November 24, 2014

The Late Victorian Corset: Part 3


I have been working diligently on the Victorian corset this week and have made a lot of progress! More progress than I have photos of actually, when you get going sometimes you forget to document these things! I have completed most of the final corset now, I just need to attach the binding and floss the boning channels. I still haven't found a good lace for the top edge, but seeing as that doesn't effect the function of the corset, I can keep looking.

I had hoped to find a herringbone twill to use for the strength layer of this corset, but I could barely find a heavy weight regular twill, let alone a herringbone one. I know I should just buy coutil (fabric specially woven for corsets) but I am impatient and cheap so I have never bothered to spring for it! I ended up going with a mauve-ish colored medium weight cotton twill. I of course didn't care what color the strength layer would be, it was all about finding something strong that wouldn't stretch much. I also bought some twill tape for making additional boning channels inside. Then of course I had to buy the steel boning itself, I ended up getting mostly spiral steel boning and some flat spring steel as they didn't have every pre-cut length I had wanted in the spiral available. I don't usually use spiral steel so I don't mind having this corset be half and half.

Putting the corset together went smoothly and I was pleasantly surprised I remembered how to insert the busk and finish the front edges from making the Edwardian corset last winter. It seems silly now I was so afraid of using busks when they are actually no trouble at all! I have my eye on a busk with gold plated hooks and pins for another corset down the line (magenta with a gold busk and gold flossing!).


As of now, I have inserted the grommets down the back and inserted all of the boning into the channels. The next step is always the most nerve wracking, trying the darn thing on! Luckily, it fits, at least it isn't too small! It isn't really too big either, I just wish I had taken off another inch all around because, drum roll please, the edges do meet in the back when laced up! I had modified the pattern, removing about a half inch, and hoped between doing that and the stiffer fabric everything would have shrunk a bit more, but alas it is still a bit too big. But other than my nit pickyness about the lacing closing, it fits rather well. I am really happy with how the bust area fits/supports the top. The shape it creates is really pretty and will be great for my bustle era projects planned for next year.

Because it is a bit bigger than I would like, I don't have as much waist reduction as I had hoped. Resting I have about a 31" waist and this corset can only take me down to a 29" at best with the back fully closed. I plan on making a second corset for "evening" wear that is smaller and can get down to a 28-27" waist. Even though my waist measurement is not greatly effected by this new corset, it does look much smaller because a corset makes your waist much more round as opposed to the more oval shape of the body naturally. So though the measurement is the same, the shape makes the waist appear smaller. So that's always a nice effect :)

I hope to finish attaching the binding and get going on the flossing this week so that I can show you all the finished corset! I'm off to the sewing room again...

November 21, 2014

Hair Comb History Highlight #10: Golden Combs

René Lalique, 'Three Nymphs' hair comb of blonde horn, enamel and gold. Circa 1899. Hamburg, Museum für Kunst und Gewerbe Hamburg
Though I have covered a large array of hair combs to admire here on the Hair Comb History Highlights series, I have somehow yet to cover gold combs! Though gold can be designed to look very contemporary, the material's use in jewelry and hair combs dates back millenia. Their are several ancient examples of gold hair pins and combs from all over the world but today we will be admiring their 19th century European counterparts.

The first few combs here are from the Regency (or Empire) era. Their distinctive shape, a tiara like curved comb with long thin tines, gives away their date. Called Empire combs or Josephine combs after Napoleon's reign in France and his wife's penchant for wearing the combs respectively. I think I will be doing a separate post entirely devoted to Empire combs soon!

Pearls, lapis, and gold decorate this French Empire comb, c. 1800.
French vermeil and faux garnet diadem crown / hair comb tiara, dating to the early 1800s. Embellished in neoclassical motifs, a patterned frieze accented by faux garnet beading surmounted by a gallery of scrolling openwork crowned by faceted cut 'garnets'. Plated in a high carat of 18k to 22k gold.
Empire comb, emblematic heading with Napoleonian laurel crowning motif, alternating with blue glass stones inlaid with powder of gold (certainly from Murano, Italy)
18K-gold, pearl, and lapis Victorian crown-shaped tiara on a tortoiseshell comb. c.1850.
Mid-Victorian era comb, gold, turquoise, and enamel on a tortoiseshell base

November 20, 2014

Brilliant: Cartier in the 20th Century


On Tuesday night I had the distinct pleasure of attending a VIP showing of the new exhibition Brilliant: Cartier in the 20th Century at the Denver Art Museum. I was so lucky to get to work on parts of the exhibition as an intern this summer, researching vanity cases, organizing spreadsheets, and attempting to source photos. What a great project to get to work on as a vintage lover right?

The exhibition is finally open after literally years of work for the museum, and it is fabulous! There are over 250 pieces of archive/vintage Cartier in the exhibition, spanning from the years 1900 to the 1960's. From the Edwardian tiaras to the 1920's Egyptian revival cigarette cases, I was in awe from beginning to end. I had seen images of the pieces all summer and yet was still stunned when finally viewing them in person! Luckily for you, the Denver Art Museum and Cartier are allowing photographs for this exhibition...


One rarely gets the chance to wear their shining rhinestone hair combs, I had to take the opportunity to get decked out in finery of course! I made the dress a few weeks ago, though sadly I didn't end up with any good photos of the back, which was the time consuming part! The back has an art deco stepped cutout with sheer black sequined net filling in the opening, I promise I will take more photos of this dress soon so you can have a look! I hand beaded the neckline with black bugle beads and seed beads for a bit more sparkle. Shape wise it is very similar to my one-hour 20's dresses, I just added darts to the bust to help it fit better as a sleeveless dress. The black moire fabric is some sort of thermoplastic fiber, my guess is acetate. I love this fabric, I have a thing for moire.

In addition to my rhinestone leaf combs, I wore a rather 20's pair of rhinestone earrings I got at a modern accessory store called Charming Charlie. The place is stuffed full with questionably Claire's-like cheap jewelry, but there are gems hiding in the rest of the rough! I stick to the formal/prom area and have found a few vintage styled pairs of earrings there. The necklace is a little lariat that I showed you all last week.

I will definitely be visiting the exhibition again to marvel at the jewels and get more photos. The photos in this post are actually all from my mom who I took with me as my plus one! I'm eager to grab my camera and go back for more. In the meantime, if you live anywhere near Denver I highly recommend seeing this exhibition as the jewels are marvelously beautiful and the exhibit is well designed and overall quite divine!

Dress: Made by me
Jaguar Pin: Vintage (etsy)
Earrings: Charming Charlie
Necklace: Made by me
Hair Combs: Ebay (here)
Shoes: Jessica Simpson (from ages ago)
Tights: Amazon (here)
Purse: Givenchy, vintage ($12!)

November 19, 2014

Closet Histories #3.2 : The Silver Tissue Gown


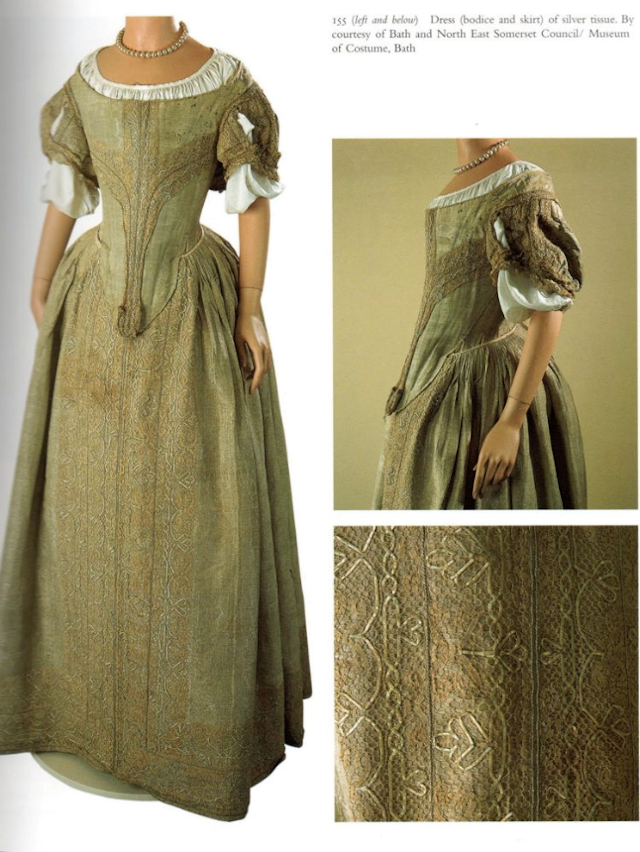
Today we take a look at another rare survivor though time, the silver tissue gown from the Bath Fashion Museum. Dating from around 1660, an example of the most popular style of its time with its wide neckline, structured bodice, short sleeves and pleated skirt. Though it may appear a bit worn and drab today, it was once resplendent in all its shining silver glory. The silk fabric is woven with silver metallic threads which made the dress gleam like liquid metal when it was new so many centuries ago.

c

The gown is a perfect example of the 1660's silhouette. The bodice is boned and stiff to create the conical off the shoulder shape. The sleeves are short with openings for the fine linen chemise to puff through. Both the bodice and the skirt are decorated with fine lace and tiny thin strips of parchment woven like cord through the lace to create an abstract floral design. As the label from the Bath Fashion Museum states below, it is rather a small dress, possibly for a girl or young woman being presented at court.

Label from my visit to the museum in 2012


Though the two photos above are of less than ideal quality (these were the dark days before I had a DSLR), I wanted to include the label and show the sparkling effect the silver silk still has today. The low lighting of the museum, like the candle light of the 17th century, allows the dress to sparkle in the most beautiful way. I felt so honored to be able to see this dress in person, it felt like a pilgrimage to finally be standing before it. Anyone who studies historic dress for long knows of those select holy grail type survivors (most of which I have covered on Closet Histories before like Elizabeth I's effigy stays and Eleonora de Toledo's funeral dress). The older pieces of costume that have miraculously survived certainly hold a sort of reliquary quality today.

While searching for photos for this post I came across a particular album of photos from Cathy Hay, renowned in the online historic dress community for her sewing mastery and devotion to the study of dress. It seems Cathy was able to take a close look the the silver tissue gown off display at the museum! What a great opportunity to see what the dress looks like up close and inside, and also learn how such a dress was put together in the 17th century. Click on the photos below to be taken to Cathy's photobucket page with the rest of her fascinating photos!


The back of the bodice, giving us a glimpse of the lining. Notice how much support the museum has constructed to maintain the shape and condition of the garment. Acid free fabrics and tissue paper, and also approved types of foam, are all tools for a museum to ensure the garments are stored in a safe way.


Here is the front of the bodice. You can see areas of the fabric have brown dots like foxing on old paper, here the problem could also be oxidation of the metallic threads in the silver fabric. Silk is fragile at the best of times, but silk that is over 300 years old is even more so. You can see how the bottom edge of the bodice has bound tabs like stays. The stiff bodice is essentially providing the function of stays, being a fusion of the usual two layers, stays and bodice in one.


Here we see the waist of the skirt. There are literally hundreds of pleats in the skirt which are sandwiched in what looks like a linen tape waistband. The center front is left smooth with no pleats and the skirt closes in the back by knotting the ends of the waist ties.

The 17th century is the last where extant examples of dress are extremely rare and uncommon. Looking forward as we eventually move into the 18th century, we will have many more extant examples to study and I for one can't wait! But first, next week we take a look at the 17th puritan and the movements influence on fashion, see you then!


All of the information for this post has been gathered from the textbook Survey of Historic Costume (5th edition) by Phyllis G. Tortora and Keith Eurbank, from the links above or my own knowledge. I want to share the resources I come across with all of you as much as possible. The portraits used to illustrate today's post are credited to either the museum where they reside (whenever possible) or the source where I found them, and are linked via their fig. # underneath. Again I repeat my disclaimer that I am not a historian, and if you have corrections or additions for this post, please begin the discussion in comments as I would love to learn more!


Thanks for reading! 


November 18, 2014

Born Pretty Store Review: Nail Art Goodies


Being as obsessed as I am with nail art these days, it was impossible to ignore the cited source of so many nail bloggers goodies, Born Pretty Store. At first I was a bit afraid of ordering from a seemingly random e-commerce site all the way from China but everything arrived, and was safely packed too. Though I will note, the shipping did take five weeks, which for someone as impatient as me was agonizing! However, the shipping was also free so I really can't complain. Onto the fun goodies...


The first thing I wanted to try was nail foils, very thin layers of shining foil on thin plastic that you can stick onto your nails for a sparkling metallic manicure. I am really excited to use these as I always wanted to get one of those minx metallic manicures that were so popular a few years ago.


The tool I was most excited about getting my hands on was this XL nail stamper for doing stamping manicures! I had been using a tiny little stamper so this will be a nice step up and hopefully once I get the hang of it will lead to even more fun stamped manicures! I also picked up two new stamping plates BP-05 and QA92. I especially wanted BP-05 for the Norwegian folk painting-ish design at the bottom of the plate. I have tested both plates and can attest that they are etched well and the designs transfer quite well.


I also picked up these great gold swirl stickers that I have already used and I can report that they work really well! They are super pretty and don't lift off at all. The multicolored swirling water decals are another type nail art I have yet to try. The designs are quite small compared to the size of my nails so I think I will have to use them as an accent nail as opposed to a full manicure design. I also finally invested in a set of dotting tools with various sized ends which will be rather useful for future designs. The tiny roll of super thin tape in the bottom of the photo is known as striping tape and is metallic silver. It can be used to create designs by painting over the tape and then pulling it off creating thin lines, or can itself be used as a sticker metallic line. The last item I decided to try was the wheel of tiny metal star shaped studs which I think will be awesome accents on future galaxy nails.

I am really happy with everything I ordered and was surprised at just how good the quality of each item was for the super affordable prices. Some of these items cost me just 99 cents! Between the great prices and the free shipping, investing in all these nail art tools didn't feel like investing at all!

As a disclaimer I must also add that I purchased everything in this post with my own money and was not provided these products for review.


November 17, 2014

The Late Victorian Corset: Part 2


So, when we left off I had discovered the Corsets and Crinolines pattern was exactly 10 inches too small for my measurements. I was all worried that I had a lot of math to do. In actuality, this was the best discovery I could have made because it made re-sizing the pattern very simple! Since proportionally the corset was perfect for me, a 10" difference between the 30" bust and the 20" waist was the same as the 10" difference between my 40" bust and 30" waist. I decide to see if that meant all I had to do was add a half inch to each side of each pattern piece. One inch added per pattern piece, 5 pattern pieces, 5 additional inches per side of the corset equaling the ten extra inches I needed! Easy math is my favorite kind :)


Here is the pattern after I added the 1/2 inch to each side, another 1/2 inch for seam allowance and then 1 inch to the top and bottom of each piece to play with how tall/long the corset would be. I like to be extra methodical with corset making so I don't screw anything up, so you can see I have numbered and highlighted the top of each piece in blue.


Measuring the new pattern resulted in the measurements matching my own quite perfectly. The waist of the first pattern turned out to be a little less than 20", which was fine as I would like the new measurement to be around 28". Some waist reduction is always nice! I decided to dive in and try on a very basic mock-up of my new pattern.


So here is the mock-up. Made of only one layer of thick muslin, I know it is not a perfect representation of how the corset will behave when made of a stronger material. I did add boning at the seam lines, inserted the busk, and added a grosgrain waist tape to approximate some of the final structure. I basically made this mock up to test if the pattern would work at all. Miraculously, to my surprise and delight, it was nearly perfect! The corset fit very well, other than the fact that it closed in the back, which I have to imagine will no longer be the case when it is made out of a stiffer material than the muslin which stretches more than a coutil or twill will. I am hoping when I make the real corset that the thicker and stiffer fabric will mean the whole thing shrinks just a bit. I may take off a 1/4 inch somewhere in the pattern too, just too be sure it doesn't meet in the back. There is nothing wrong with having your corset meet at the lacing in the back, it just isn't as historically accurate and allows less room for adjusting just how tight or loose you want to be laced.

I also redrew the lines at the top and the bottom of the corset, as you can see with a blue marker above. Mostly I had to remove the one inch allowance I had added to the pattern for adjustment.


I know it is a bit of a risk not making a second mock up out of twill (hopefully I can find a herringbone twill) to see just how much a stronger (less stretchy) fabric changes the fit of this corset. The pattern went together so easily that I won't be too terribly bothered if this corset somehow comes out too small or too big and I have to make another. Its not like stay making where you have to sew a trillion straight lines only to afterwards find out something is wrong and it won't fit! That is true frustration!

 In fact this corset goes together so easily I am already thinking of making another one if this one works out. I should make a summer corset next but I am leaning towards a bright colored satin instead just for fun! Today I am off to the fabric store to buy twill, boning, and hopefully a nice black cotton lace for the top edge. Look for another corset update later this week!


Related Posts Plugin for WordPress, Blogger...